DIY Christmas House Using a Tea Box: Create Your Own Festive Cheer!

DIY Christmas House using a tea box—sounds fun, right? This project is super easy, budget-friendly, and a perfect way to add some holiday cheer to your home or create a thoughtful gift. Plus, it’s a creative way to recycle and turn an ordinary box into something truly special. Let’s get started and make this festive little house step by step!
12 Steps for DIY Christmas House Using a Tea Box:
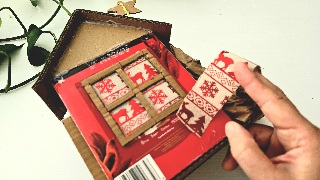
Step 1: Grab Your Tea Box
Start by finding an empty tea box (surely you have one at home, right?). Any sturdy box will work, but tea boxes are just the right size for a cute little house.
Make sure it’s clean and tape up any loose flaps so it’s nice and strong. This will be the base for our Christmas house, so it needs to hold everything together.
________________________________________
Step 2: Cut Out the Windows
Now, decide where you want the door & windows on your house. Draw them out lightly with a pencil/ pen first—it can be square, round, or even arched for a fancy look.
Carefully cut them out using scissors or a craft knife. Don’t worry if they’re not perfect; imperfections add charm! :)
Paste/ insert the cardboard door and windows frames on the cut holes.
________________________________________
Step 3: Add a Base
To keep the house steady, cut a piece of cardboard a bit bigger than your tea box and glue the box onto it. This makes it easier to decorate later and gives the whole thing a stable foundation. You can leave the base plain or add some cotton for a snowy effect—whatever you like!
I slightly cut the base, so I can insert the light later on.
________________________________________
Step 4: Add the Roof
What’s a house without a roof? Cut two pieces of cardboard to fit the top of your tea box, making sure they meet in the middle to create that classic triangular peak. Glue them in place. If you want, you can add some texture by gluing strips of cardboard or paper to mimic shingles.
The size will depend on your tea box size. You can see mine at my video tutorial.
________________________________________
Step 5: Decorate the Windows
Oh yah.. you can use some Christmas ribbon or patterned paper and stick it behind the windows to make them look festive.

Step 6: Make a Christmas Tree
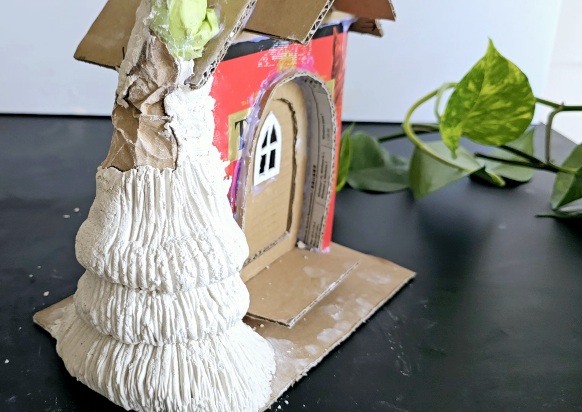
What’s a Christmas house without a tree? Grab a brown paper bag or some aluminum foil and twist it into the shape of a cone. Glue this to the base next to the house. It doesn’t need to be perfect because we’re going to cover it with clay in a bit.
________________________________________
Step 7: Add a Star
Cut a star shape out of cardboard (or use a cookie cutter to trace one). Attach it to a piece of wire from an old coat hanger and stick the wire into the top of your tree. Ta-da! You’ve got a tree topper. You can paint it gold, silver, or any color you like. For me, I'll cover the star with clay and paint it white.
________________________________________
Step 8: Make Your Own Air-Dry Clay
If you’re feeling adventurous, you can make your own clay! Mix 3 parts plaster of Paris with 1-2 parts plain flour. Add just enough water to make it doughy, then mix in a few drops of baby oil or cooking oil to keep it smooth.
Don't like this simple recipe? You can visit my clay recipe page and choose the homemade clay recipe you like there.
Don’t want to bother? No problem! Store-bought air-dry clay works just fine too. Check out my page to see what clay to buy.
______________________________________
Step 9: Cover the House with Clay
Here’s where it starts coming together! Take your clay and begin covering the whole house, starting with the Christmas tree and the star. For the tree, start at the bottom and work your way up to give it a layered, textured look. Cover the walls, roof, and base, smoothing it out with your fingers as you go. Use water spray to keep the clay moist and soft if needed.
________________________________________
Step 10: Add Texture and Details
Also, use the clay to add fun details, like a stone arch around the door, bricks on the walls, or snowy edges on the roof. A toothpick or fork works great for creating textures. This is your chance to get creative—make it as simple or detailed as you like!
________________________________________
Step 11: Cover Any Leftover Cardboard
If you see any spots of cardboard peeking through, cover them with more clay or joint compound (wall filler). This gives the house a polished look and makes it feel like a real little cottage. Let everything dry completely before moving on to the final touches.
________________________________________
Step 12: Add Lights and Finishing Touches
Now for the best part! Place an LED tea-light candle inside the house and watch it glow through the windows. It gives our house a cozy, magical vibe—perfect for Christmas!
________________________________________
Optional Step: Paint It White
I decided to keep things simple and painted my whole house white for a snowy winter look. You can do the same or go wild with colors—it’s totally up to you. Either way, it’s going to look amazing!
And there you have it—your very own magical DIY Christmas house using a tea box! Isn’t it amazing how something so simple can turn into such a charming holiday treasure?
This project isn’t just fun—it’s a keepsake you can truly be proud of. Whether you light it up on your windowsill, make it the centerpiece of your decorations, or gift it to someone special, this little house is guaranteed to spread warmth, joy, and holiday cheer wherever it goes. So go ahead, let your creativity shine, and bring a little extra magic to the season!
Want to watch the video on how to make this DIY Christmas house using a tea box? Head on to my Clayitnow's You tube channel. Or, click on below image.
| Home | Fairy House Ideas | ^Top of Page |
Please LIKE, SHARE and SUBSCRIBE to support my channel.
Share your craft
Do you make your craft? Share it!

