Cute Strawberry-shaped Jar Using Waste Materials - Fun & Functional Craft
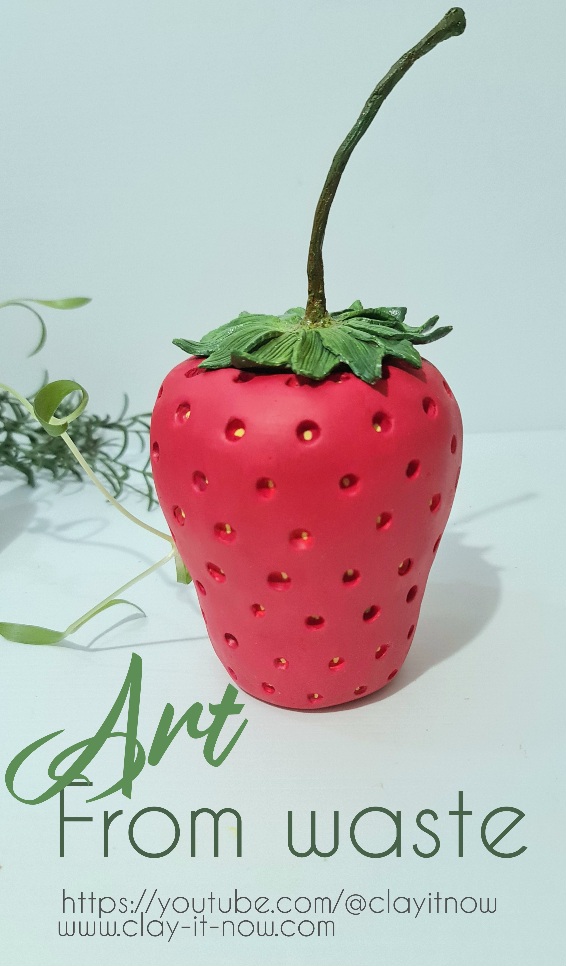
Let's turn an old jar to a strawberry-shaped jar using waste.
Using just a few simple materials, including a mason jar, paper waste, and texture paste, you can transform an ordinary jar into a whimsical piece of décor.
But what really brings this project to life are the leaves that cap the top of the jar. Made from no-cook cold porcelain clay, these leaves give the jar a pop of color and complete the look of a perfectly plump strawberry. Don't forget to paint the leaves green and add a small stem to really drive home the strawberry theme.
By the way, this project is not only fun and easy, but it's also a great way to give new life to old, forgotten materials. So why not try your hand at making your own strawberry-shaped jar today? It's the perfect addition to any kitchen, bedroom, or even office space - and it's sure to put a smile on your face every time you see it.
Steps to make strawberry-shaped jar using waste materials:
To get started, you'll need a few materials, including a mason jar (any size), texture paste, paper waste, cold porcelain clay or air dry clay, glue, hot glue/ hot glue gun (optional), masking tapes, paintbrushes, water, scissors, acrylic paints and sealer/ varnish.
You can begin the fun and easy process of making your strawberry-shaped jar using waste materials now.
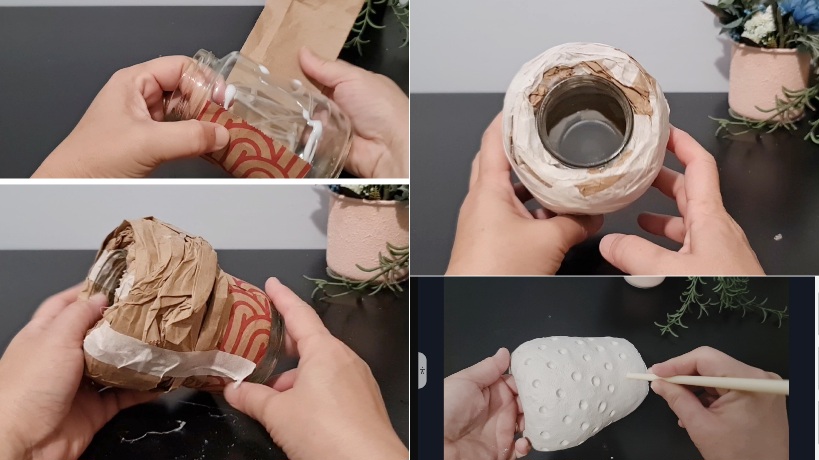
The first step is to prepare your mason jar. Make sure it's clean and free of any residue, and then let it dry completely. This will ensure that your paper waste adhere properly to the surface of the jar.
Once your jar is prepped, apply glue then a layer of brown paper from food delivery paper bag or other paper waste. This way, you will see clean, brown color paper from inside the jar.
Once the first layer of paper dry, add more paper to build the strawberry shape. If you have hard/ stiff brown paper, spray water on it to make it soft and moldable. Use hot glue/ hot glue gun (optional) or masking tapes to secure the paper and the shape you make.
Next, prepare your texture paste. You can use ready-made or homemade paste. I make my own texture paste by mixing 3 parts plaster of Paris, 1 part plain flour, water (just enough to achieve consistency I like) and few drops of oil. By the way, there are 2 types plaster of Paris, the one sold purposely for craft or for building. I tried both and both gave me the same result.
I apply a thick layer of texture paste to the outside of the jar using spatula/ palette knife to spread the paste.
You can be as creative as you want with the texture paste, creating a rough and bumpy surface that mimics the exterior of a real strawberry. You can even add small bumps or ridges to give your jar a more realistic look. Or, make a child-like shape with smooth surface.
Make sure to cover the entire strawberry surfaces.
The texture paste became hard after few hours or the next day depending on how thick you apply them and also the humidity in your place.
My texture paste dry about 80% the next day, Then, I use clay tool to make texture (dots) by pressing it halfway to the paste.
While waiting for the texture paste on the jar to dry completely, it's time to create the green leaves that will cap the top of the jar.
Before making the leaves, I make the lid first by cutting a piece of cardboard in round shape with size slightly bigger than the jar opening. Insert a wire through the cardboard to make the stem, then covered the wire with masking tapes. Cover the cardboard and wire with texture paste. Let it sit on top of the strawberry until it’s dry.
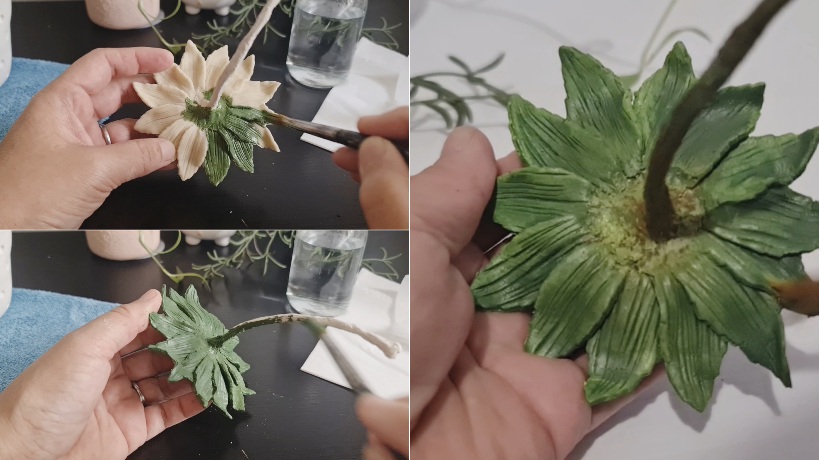
Next, take your store-bought or handmade clay. I use no-cook cold porcelain clay with 3 ingredients: rice flour, glue, and few drops of cooking oil. I don’t have exact measurement for the flour and glue, but approximately 2rice flour: 1glue. Mix those 3 ingredients and knead the clay well.
This is kind of recipe experiment to me to check if the mixture will work for my craft. Well, it works but honestly I still prefer my homemade air dry clay. It has same ingredients with the texture paste but less water.
If you prefer to use ready-made clay, check-out my store.
Alright! let's continue. Use rolling pin to flatten the clay, then use cutter to make leaf shapes. I pull the leaf to make it longer.
Check your lid. After the texture paste on the lid dry, apply glue on top of it, and then place the green leaves on top, overlapping slightly.
Paints the leaves after the clay dry and also the stem. I mix dark green with lighter green, add a little bit of burnt sienna in the middle part and use dry brush technique to add highlight on the leaves.
Once the paint dry, you can seal the surface with a clear varnish or mod podge. This will protect the surface and give your leaves a glossy finish.
After that, go back to the strawberry-shape jar. It’s time to paint the jar with bright red color.

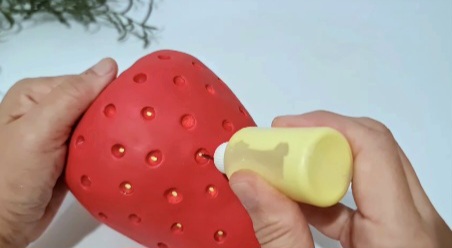
Then, add yellow dots inside the holes that made before. I mix glue, yellow paints, plaster and water. Then I pour the mixture to a small bottle with small needle applicator on it as you can see in my video.
This is my first time to use that bottle. It works for me. Have you tried it before?
The easy way is to use 3D pen or use toothpick dipped in thick acrylic paints. The choice is yours.
And there you have it - a beautiful and unique strawberry-shaped jar using waste materials! Not only is this project eco-friendly, but it's also a great way to exercise your creativity and have fun while doing it.
And the best part? You can customize your jar to fit your own personal style and taste.
If you're feeling adventurous, you can even add other decorative elements to your jar, such as small artificial flowers or butterflies. This will give your jar a whimsical and magical look, perfect for any fairy garden.
Making a strawberry-shaped jar using waste is a fun and creative project. Most importantly, it's also a great way to teach children about the importance of recycling and protecting the environment.
You can get your kids or grandchildren involved in the process, letting them tear and glue the paper waste to shape the jar, or paint the leaves.
And once the jar is complete, you can use it as a teaching tool to help children understand the importance of reducing waste and reusing materials. You can fill the jar with healthy snacks or treats, and use it as a fun way to teach children about healthy eating habits.
But this project isn't just for children. It's a great way for adults to exercise their creativity and artistic skills, while also doing their part to protect the environment.
And let's not forget about the practicality of this project. Using a mason jar to create a strawberry-shaped jar means that it's durable and easy to clean.
You can fill it with your favorite snacks, and then wash it out and reuse it over and over again.
When you put candy or chocolate, people may not realize that you make this strawberry-shaped jar using waste, making it a great conversation starter when guests come over.
So whether you're looking for a fun and creative way to reuse waste materials, or you just want a unique way to store your candy and chocolate, making a strawberry-shaped jar is a great option.
It's easy, fun, and eco-friendly, making it a win-win situation for everyone involved.
And who knows? Once you've made your first strawberry-shaped jar, you might just get hooked and want to create more. You could make a whole set of jars in different shapes and sizes, using different materials and textures.
The possibilities are endless, and it's all up to your imagination and creativity.
So why not give it a try and see what kind of masterpiece you can create?
Not only will you be doing your part to protect the environment, but you'll also be adding a touch of whimsy and fun to your home décor.
If you want to see me making this strawberry-shaped jar, you can watch my video below.
Please remember to subscribe to Clayitnow channel and turn on the notification, so you'll be notified when new craft video uploaded.
Btw, if you like to make strawberry fairy house, you may like the tutorial I shared in my channel.
| Home |^Top of Page |Pottery looks Craft Idea|Fairy House Ideas|
Please LIKE, SHARE and SUBSCRIBE to support my channel.
Share your craft
Do you make your craft? Share it!


